If you’re a proud owner of a JVC radio, you know how crucial it is to keep your device in top shape. One of the most basic yet essential functions of any radio is setting the clock. Whether you’re using your JVC radio at home, in your car, or at the office, knowing how to set the clock is important not just for keeping track of time, but also for utilizing various features of the device, such as alarms and timers.
In this comprehensive guide, we’ll take a deep dive into everything you need to know about setting the clock on your JVC radio. We’ll explore the various models, provide step-by-step instructions, and troubleshoot common issues. So, grab your JVC radio and let’s get started!
Understanding Your JVC Radio
A Brief Overview of JVC Radios
JVC (Victor Company of Japan, Limited) has a long history of producing high-quality audio equipment, including radios, home audio systems, and car audio devices. Their radios are known for their durability, excellent sound quality, and user-friendly interfaces. JVC offers a variety of models, each with unique features, but the basic functions—like setting the clock—remain relatively similar across the range.
Different Models of JVC Radios
Before we dive into setting the clock, it’s essential to understand that JVC radios come in various models, each with slightly different settings and interfaces. Common models include:
- JVC Portable Radios: These are compact, battery-operated radios perfect for outdoor use.
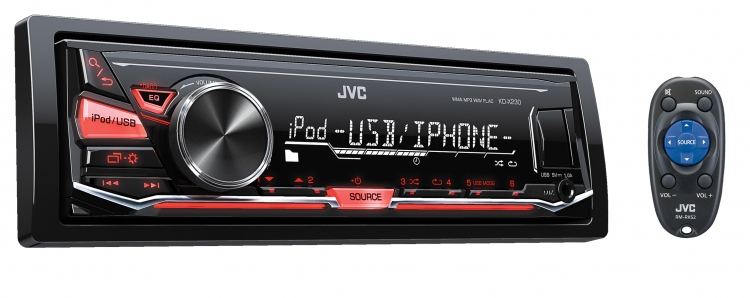
- JVC Car Radios: These models often come with additional features like Bluetooth connectivity and CD players.
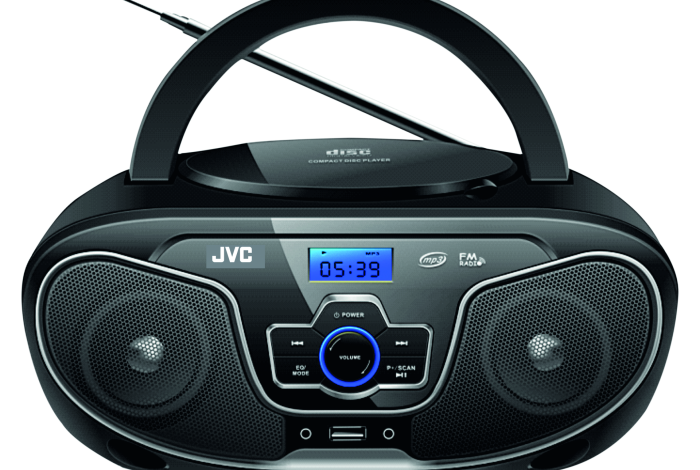
- JVC Home Radios: These typically include more robust speakers and may offer additional functionalities such as internet radio.
Each model may have specific steps for setting the clock, so make sure you know which model you have before proceeding.
Getting Started: Preparing to Set the Clock
Locate the Owner’s Manual
Before you attempt to set the clock, it’s always a good idea to have your owner’s manual handy. The manual contains model-specific instructions and diagrams that can make the process much easier. If you don’t have a physical copy, you can often find a digital version on the JVC website.
Identify the Control Buttons
Familiarizing yourself with the control buttons on your JVC radio will make setting the clock a breeze. Common buttons you may encounter include:
- Power Button: Turns the radio on and off.
- Volume Control: Adjusts the sound level.
- Menu Button: Accesses settings and configurations.
- Clock/Set Button: Used specifically for setting the clock.
Power On Your Radio
Ensure your JVC radio is powered on before you start. If it’s a battery-operated model, make sure the batteries are fresh or that it’s plugged into a power source.
Step-by-Step Instructions for Setting the Clock
Setting the Clock on JVC Portable Radios
- Turn on the Radio: Press the power button to turn on your JVC portable radio.
- Access Clock Settings: Press and hold the Clock/Set button. This action will typically initiate the clock-setting mode.
- Set the Time:
- Use the Tune/Seek buttons to adjust the hour. Some models may require you to press these buttons repeatedly to advance through the hours.
- After setting the hour, press the Clock/Set button again to confirm.
- Adjust Minutes:
- Again, use the Tune/Seek buttons to adjust the minutes.
- Confirm your selection by pressing the Clock/Set button once more.
- Exit Clock Setting Mode: Press the Menu or Power button to exit the settings mode. Your clock should now display the correct time.
Setting the Clock on JVC Car Radios
- Power On Your Car Radio: Start your vehicle and turn on the JVC car radio.
- Access the Clock Setting: Locate the Menu button on your radio. Press it until you find the clock settings option.
- Set the Time:
- Use the Tune/Seek knob to adjust the hour. Depending on your model, you may need to press a specific button to switch between hour and minute settings.
- Once the hour is set, confirm your selection by pressing the Enter or Set button.
- Adjust Minutes: Repeat the process to set the minutes, using the same buttons.
- Save Your Settings: Make sure to save your settings by pressing the Enter or Set button again. This will ensure your time is stored correctly.
- Exit the Menu: Press the Menu button to return to normal radio operation.
Setting the Clock on JVC Home Radios
- Turn on Your Home Radio: Ensure your JVC home radio is powered on.
- Access Clock Settings: Look for a button labeled Clock or Menu and press it.
- Set the Time:
- Similar to the portable and car radios, use the Tune/Seek buttons to adjust the hour.
- Press the Clock/Set button to confirm.
- Adjust Minutes: Again, use the Tune/Seek buttons to set the minutes and confirm.
- Exit Clock Setting Mode: Press the Menu or Power button to exit. Your clock should now be set.
Troubleshooting Common Issues
Setting the clock on your JVC radio should be a straightforward process. However, you may encounter some common issues. Here are a few troubleshooting tips to help you resolve them.
Radio Does Not Respond
If your radio doesn’t respond when you press buttons, try the following:
- Check Power Supply: Make sure the radio is powered on, either through batteries or an electrical outlet.
- Reset the Device: For some models, a factory reset may resolve any internal errors. Refer to the owner’s manual for specific instructions on resetting.
Incorrect Time Display
If the time is displaying incorrectly, it may be due to:
- AM/PM Confusion: Make sure you’re setting the correct AM or PM time.
- Daylight Saving Time: Check if your region is currently observing Daylight Saving Time, and adjust accordingly.
Clock Resets After Power Loss
If your clock resets every time you turn off the radio, it could be due to:
- Weak Batteries: If your radio is battery-operated, consider replacing the batteries.
- Power Source Issues: For plugged-in models, ensure the power source is stable.
Additional Features and Functions
Setting Alarms
Many JVC radios come equipped with alarm functions that can enhance your experience. Here’s a quick overview of how to set alarms:
- Access Alarm Settings: Similar to setting the clock, look for an Alarm button or access it through the Menu.
- Set Alarm Time: Use the same buttons as before to adjust the alarm time (hour and minute).
- Confirm and Activate: Save your settings and ensure the alarm is activated.
Utilizing Sleep Timers
If you enjoy falling asleep to the radio, setting a sleep timer can be beneficial. Most JVC radios have a sleep function that automatically turns off the device after a set duration. Here’s how to use it:
- Access Sleep Timer Settings: Press the Sleep button, if available, or navigate through the Menu.
- Set the Timer Duration: Use the Tune/Seek buttons to select the desired duration (e.g., 15, 30, 60 minutes).
- Confirm and Exit: Save your settings to activate the sleep timer.
Care and Maintenance of Your JVC Radio
To ensure your JVC radio continues to function well, regular maintenance is crucial. Here are a few tips:
Keeping Your Radio Clean
- Dust Regularly: Use a soft, dry cloth to wipe down the exterior and remove dust. Avoid using abrasive cleaners that could scratch the surface.
- Avoid Moisture: Keep your radio away from humid environments, as moisture can damage internal components.
Updating Software
If your model supports software updates, make sure to check for updates periodically. New updates can enhance functionality and fix any existing bugs.
Storing Your Radio
If you don’t plan to use your radio for an extended period, store it in a cool, dry place. Remove batteries if applicable, to prevent leakage.
Conclusion
Setting the clock on your JVC radio is a simple yet vital task that enhances your overall experience with the device. By understanding your specific model and following the step-by-step instructions provided, you can easily keep track of time and make the most of your JVC radio’s features. Whether you’re using it at home, in your car, or on the go, mastering this fundamental skill will help you enjoy your JVC radio to its fullest.